Workbench
© Brooke Clarke 2015
Description
Size
RTC42 Options
Location
To Be Determined (TBD)
Step-by Step
Bill Of Material (BOM)
Tools
Lumber Dimensions
Knots and Checks
Cut List
Finishing
Trial Fit
Attach Brackets
Top Finishing
Attach Top
Photos
Related
Links
Background
Saw the Simpson WBSK (Work Bench Shelving Kit) and was about to buy it, but when I saw that the finished dimensions were only 2' x 4' I looked into other options since this is way too small.
The Ron Paulk Workbench (YouTube, PaulkHomes) has many very nice features and would be excellent if I was a woodworking professional that had an existing shop and the expensive tools needed to build it and the professional skills needed. So I decided to build a version of the WBSK that would have a top that was one sheet of 3/4" thick plywood (i.3. 4' x 8').
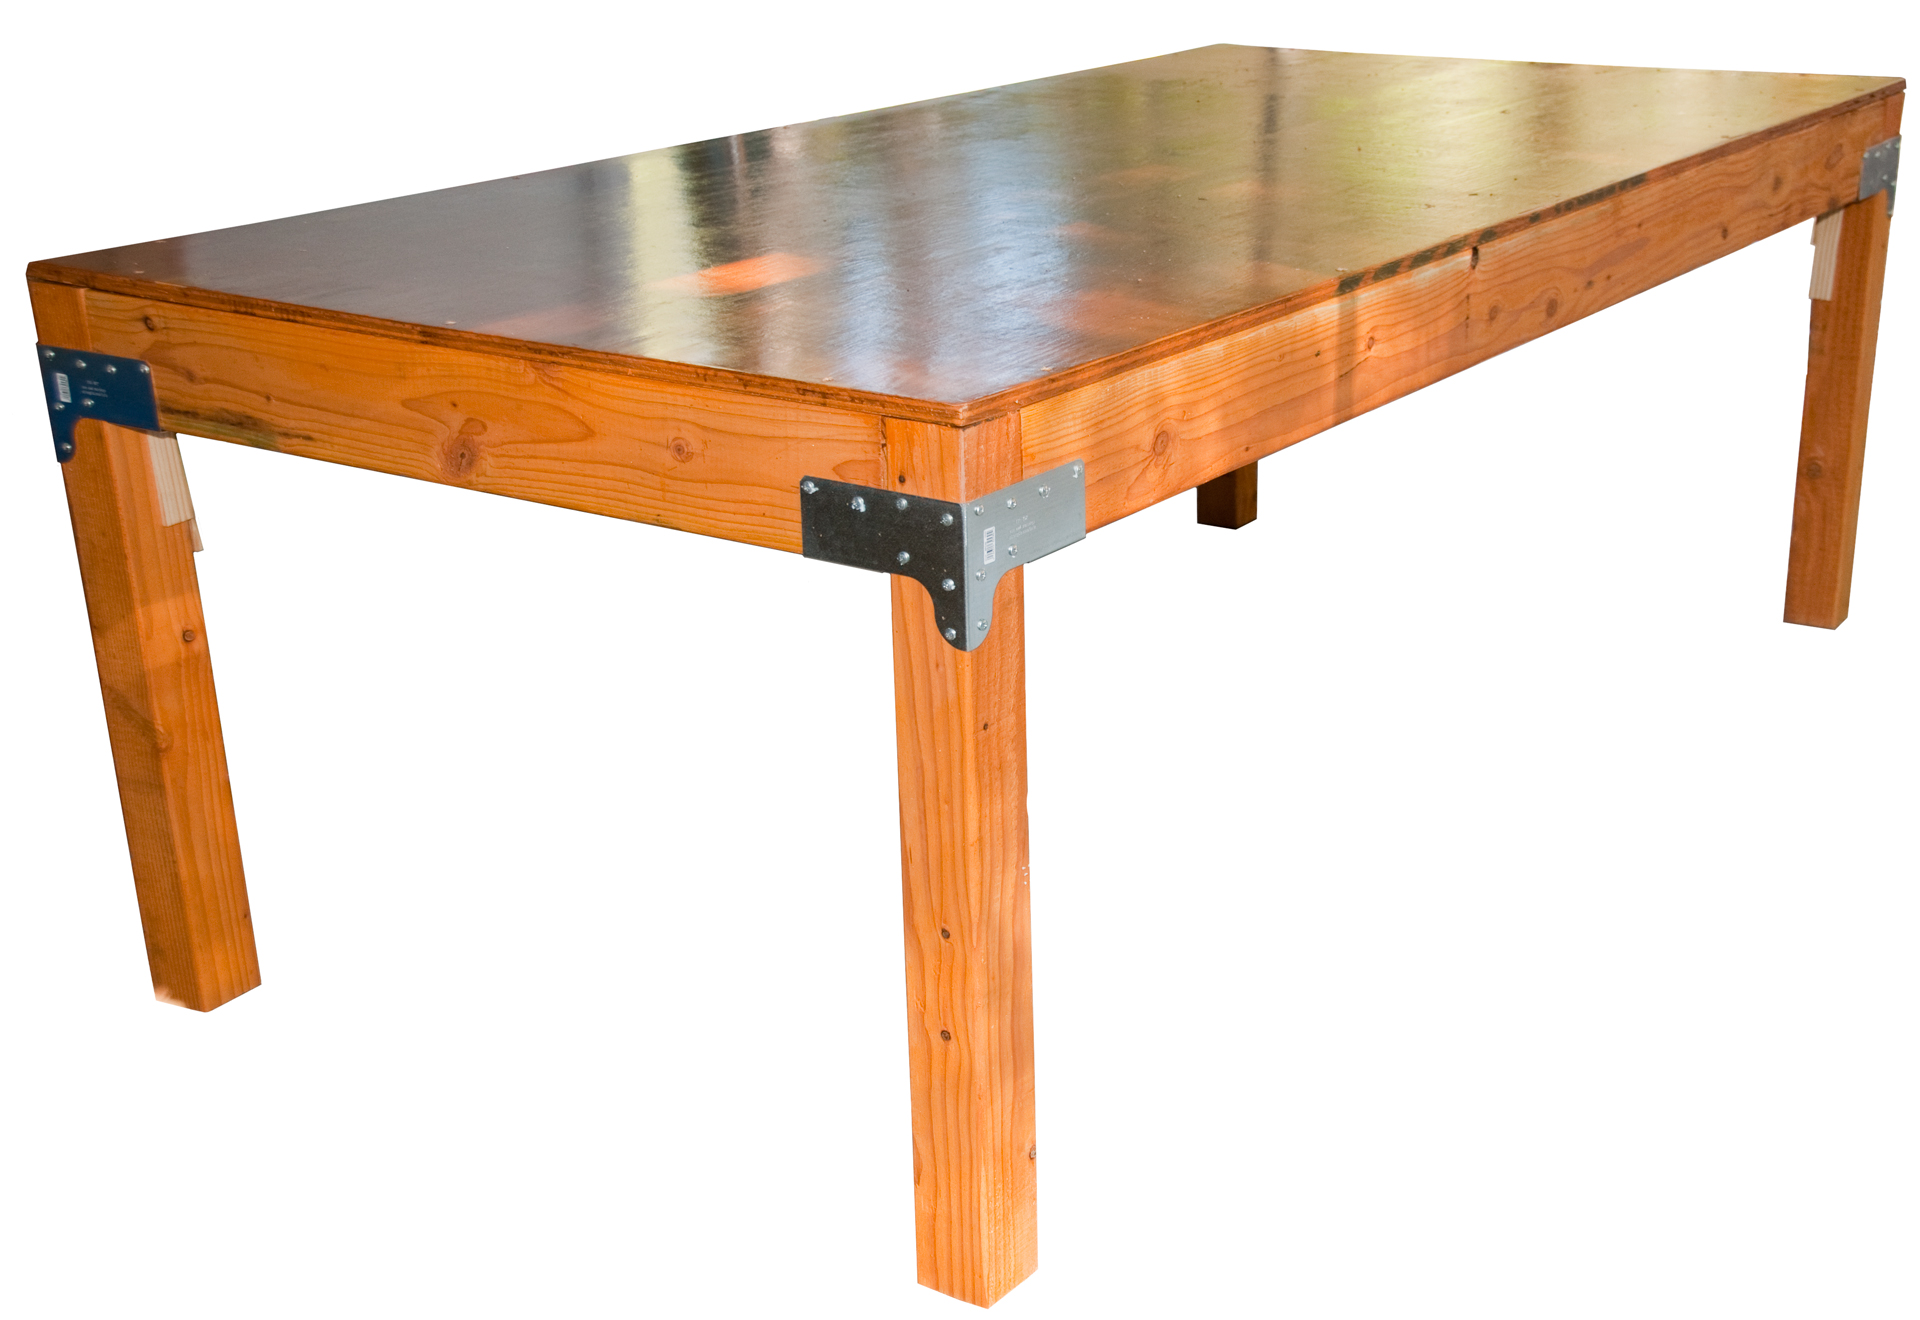
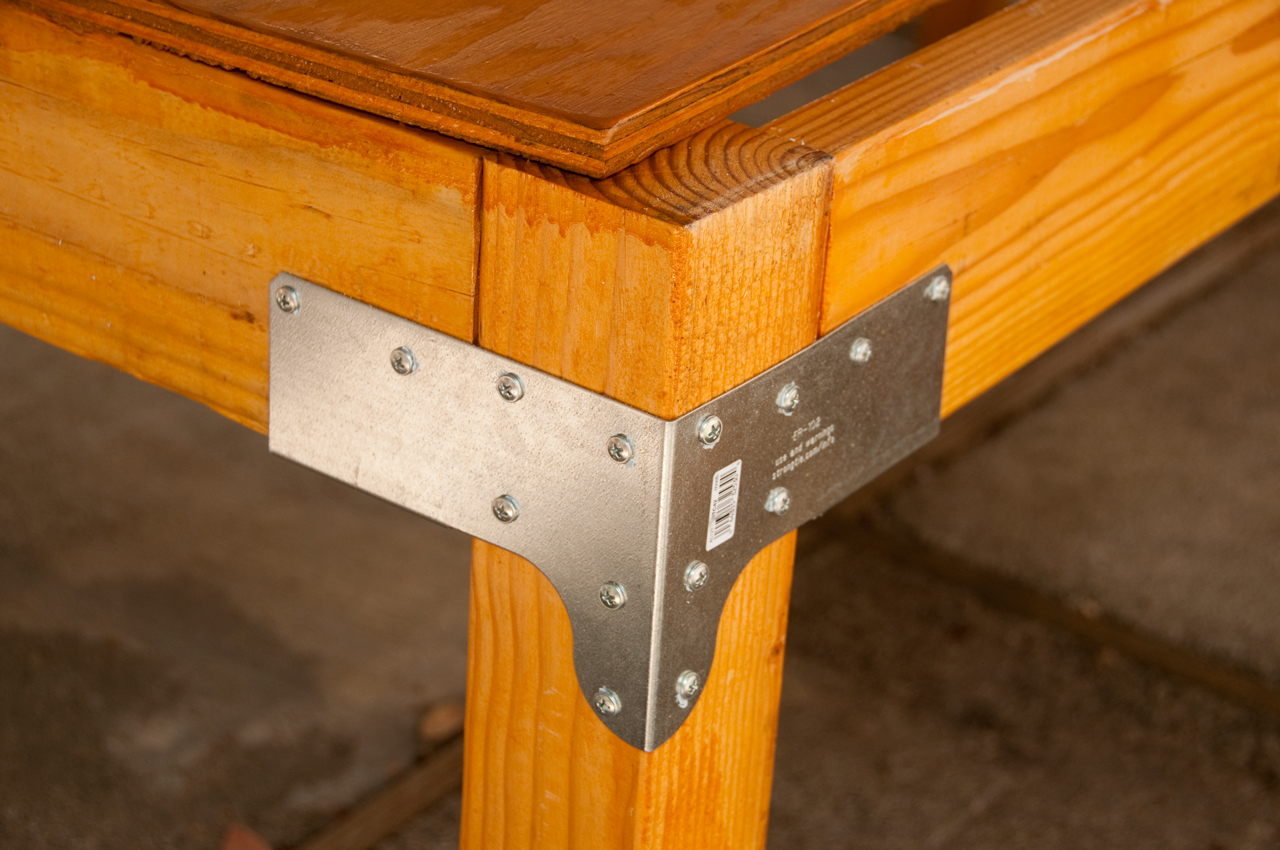
The brackets in the WBSK are designed for 2x4 joists and 2x4 legs, but for this bench I wanted 4x4 legs and 2x6 joists. The Simpson RTC42 (see Fig 1) is the bracket for 2x joists and a 4x43 post.
2019 October update: Very happy with this bench. I'm a big guy and when standing on top it still feels very stable. I would not dare stand on any other table or bench I own. Right next to it is a purchased woodworking bench and the Ryobi TSS102L Compound Sliding Miter Saw on its own stand. As part of adding an electrical plug for the Honda EU7000iS generator, I also had the electrician install an outlet nearby so now an extension cord is not needed to use power equipment in this area. The next step will be to replace the tarp and its tubing frame with a metal awing.
Description
Size
In order to sit at the workbench (I have a bad back) I made the height of the table top and the leg clearance meet ADA (Wiki, Americans with Disabilities Act) dimensions). Table height 34", knee clearance 27".
RTC42 Options
There are a couple of ways of using the RTC42 bracket.
One way is to have the two joists sit on top of the 4x4. When this is done it would be nice to cut the ends of the 2x6 joists at 45 degrees to make a mitered corner although that's not strictly necessary. In this case the leg is cut to the table top height minus the top thickness (3/4") minus the actual 2x6 depth (nominal 5-1/2").
The other way is to have the two joists but up against the 4x4. This only requires a square cut at the end of the joists. In this case the legs are cut to 34" - 3/4" = 33-1/4. This option seems to have an advantage in that the joists help brace the legs making them stiffer when you push the table horizontally. This is the option I choose both because of the easier cutting and making the table more stable.
Location
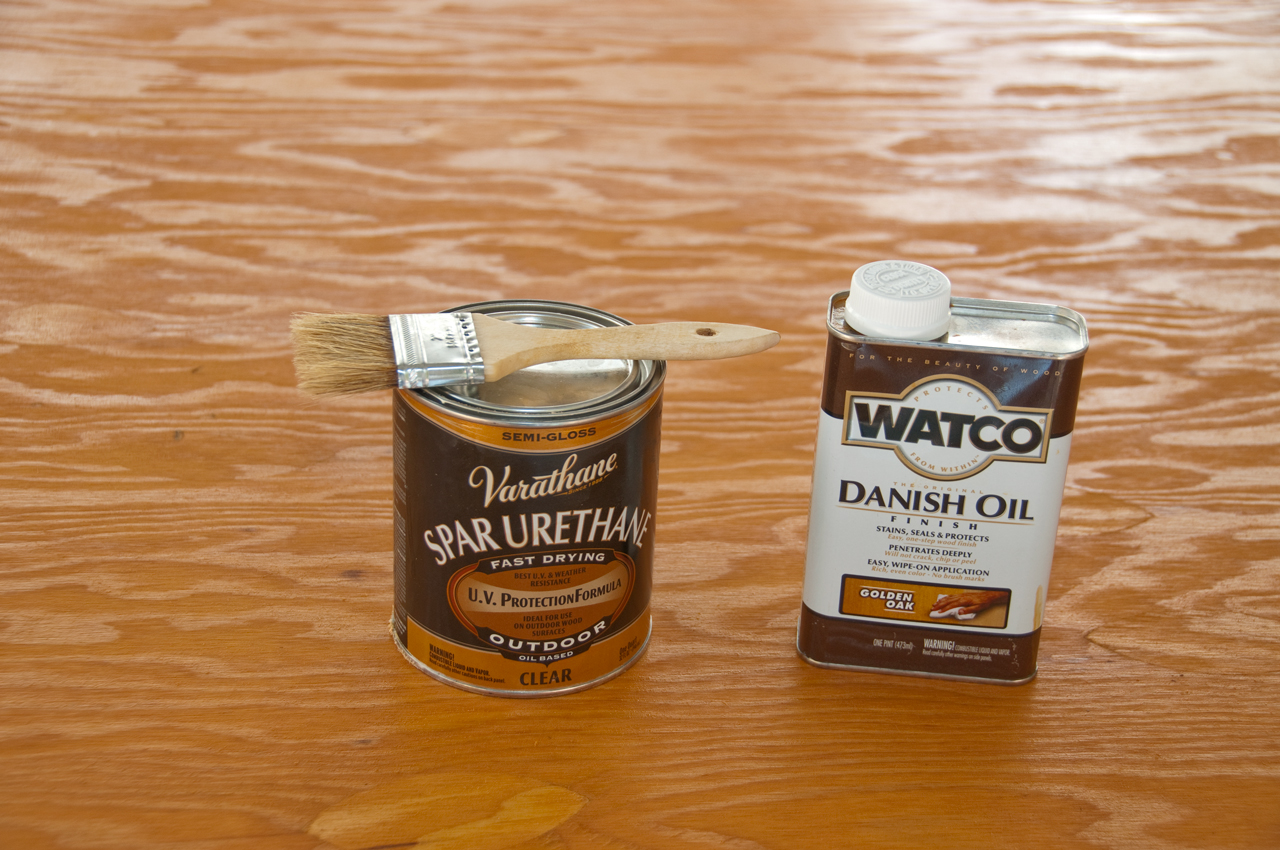
This bench will be outside under a tarp & pole carport so will be exposed to weather. To minimize water damage all the wood surfaces will be coated with a 50%-50% mix of Watco and marine spar varnish. This means that you should not saw or drill into the bench surface since that would break the water protection barrier.
To Be Determined (TBD)
There are some factors that will be determined after making the simplest workbench. These can be added later after seeing how the workbench works.
- Leg bracing. If the legs have a tendency to fold
then diagonal bracing will be added to the legs. - Not
Needed, frame is very stiff.
- Center 2x6 by 8' joist so that the span will be reduced
from 4' to 2'. This would be done if this was a floor
and so may be needed to keep the center of the table from
sagging. - not needed.
- Pocket for the Ryobi
TSS102L Compound Sliding Miter Saw. The Ron
Paulk workbench has a couple of horizontal pipes that
support a table saw at the center of the 4' wide end.
I like the idea of matching the table to a saw, but for me
having a compound sliding miter saw in a pocket so that the
saw table is in the same plane as the table top would make
it a one person job to cut long boards, like used for
bookcases (probably the next job). I have on
order a stand for the miter saw so will not be integrating
it into the workbench.
Step-by Step
In the BOM the spare option means getting an extra piece of wood in case you mess up or to avoid knots, checks &Etc.
Bill Of Material (BOM)
Rough pricing:
Lumber, brackets & screws: $100
Finishing materials (Watco, Urethane, thinner, brushes): $100
- 1 each: 4'x8' sheet of 3/4" plywood.
- 3 each (spare option 4 ea): 8' long 2x6
- 2 each (spare option 3 ea): 6' long 4x4
- 4 each: Simpson RTC42 brackets (No Pre-Drilling)
- 1 box of 100: Simpson SD8 Strong-Drive #8x1-1/4" screws
- 1 box: Deckmate T25 deck screws to attach plywood to joists (a T25 hex bit in box)
- 1 package of Shims
- 1 Quart (2 Pints): Watco Danish Oil (your choice of stain color)
- 1 Quart of Marine Outdoor Spar Urethane
- 1 package of brushes
- 1 gallon of paint thinner
Tools
As my grandmother said more than once "There's more than one way to skin a cat." and when I asked when was the best time to prune an apricot tree in my back yard she said "when the shears are sharp."
And so it is when choosing tools to make this workbench. The Makita Driver-Drill and the Skil sander were here and to I used them. They may or may not be the best choice, but the idea for this workbench is that it should be easy to make.
Cutting the lumber
I used the Ryobi TSS102L Compound Sliding Miter Saw. It pretty much removes the need to be a skilled craftsman to make a square cut. This is much different from using a hand held circular saw and trying to follow a pencil line or even trying to keep a circular saw on a guide ruler. Both of these often result in a cut that's not square and maybe not even straight.
Installing the bracket screws
Makita LXFD01 1/2" Driver-Drill
Works for driving screws when set for "9".
Makita BTD142 Impact Driver
Tears the heads off screws,
do not use unless you are a professional.
I used a Makita LXFD01 1/2" Driver-Drill. The first screw was put in (by accident) with the adjustment set for Drill and it broke the driver bit tip. After that I set the torque limit to 9 and it worked great. Don't know how charged the first battery was, but after swapping in a fresh battery drove all the screws with plenty of power to spare.
Note: I did NOT use the Makita BDT142 Impact Driver. This takes hex bits similar to the other drill drivers (with a special shank), but every time I've tried to use it the screw head ends up snapped off. Maybe it's designed to take lug nuts off semi-trucks, but for an unskilled operator it's not for driving screws.
YouTube review - Review with mention of noise (dyslexic title BDT142) when the sound changed from drive to impact you MUST release trigger!!!
It's great for driving lag bolts or very long screws.
I have a smaller Roybi hex driver that, when the low range was selected and with the use of soap on the screw threads could have driven the screws, but I expect it would have needed one or more battery charges.
A handheld screw driver would also work, but with the expenditure of much more elbow grease.
Sanding
Skil 74905-Inch Random Orbit Sander
I used the Skil 74905-Inch Random Orbit Sander for sanding the top edge of the plywood using whatever grit paper was with it.
Lumber Dimensions
Rough cut lumber is the nominal size, but you can only get that from a mill. Finished lumber used to be 3/8" smaller than the nominal size, but now they say it's 1/2" below the nominal size, but that's not the case!
The "4x4" lumber we got measured more like 3-3/8 x 3-7/16. This means that to end up with the outside of the legs right on 4' x 8" the joists need to be cut slightly longer than the side length minus twice 3-1/2". For my bench I decided to turn the 4x4s so that their long side would be lined up with the bench long side.
A problem caused by the 4x4s not being 3-1/2" square is that the RTC42 bracket was designed for a "nominal 4x4" but these actual 4x4s are undersized (less than 3-1/2" square). This means that the sheet metal will be bent out of shape when the screws are tightened. To fix that a package of shims was purchased (in the old days this could be done using wooden shingles, but those are not easily available).
Knots and Checks
None of the lumber yards around here sell clear surfaced four sides lumber and if they did it would be way too expensive for this use. So you get lumber with knots, checks (splits) and other defects. If a knot ends up right where you want to put a screw or nail that's going to be a problem so when laying out the lumber for cutting or positioning joists relative to the top you want to minimize or better eliminate knots where you're going to be using fasteners.
When cutting the 4x4 and 2x6 lumber we looked at starting to measure from one end then the other end and chose the end that would leave no knots where the brackets would be. In one case we used the spare 2x6 and so cut only one of the short 2x6s from each longer one.
Cut List
4 each 4x4: 33-1/4" long (to make top height 34")
2 each 2x6: for nominal lumber = 48 - 2 * 3.5 = 41" (for my bench 41-1/4")
2 each 2x6: for nominal lumber = 96 - 2 * 3.5 = 89" (for my bench 89-1/8")
See Fig 2.
Finishing
See Fig 7.
Some YouTube videos showing workbench construction show painting after the bench is all assembled. But that does not allow painting where there's a joint. So I coated all the cut lumber with a 50% - 50% mixture of Watco and Marine Urethane. Note all 6 faces of each board were covered, except the plywood where the bottom and sides were covered and the top will be finished after it's on the table.
A batch is one cup of Watco and one cup of Urethane.
It takes one batch for the frame, one batch for the bottom of the plywood and one batch for the top of the plywood.
Note with every batch it's a good idea to oil the edge of the plywood to seal it up.
By far this is the most time consuming part of this project.
Since this is mainly wood oiling as opposed to painting I elected to use a 2" brush and applied the mix with the grain, then worked it across the grain and finished with the grain.
When doing the top started with the edge and since there was a little left in the batch did the edge again at the end.
Note: a batch (2 cups after mixing) is good for the first coat, but for successive coats a half batch (1 cup after mixing) is about right.
Trial Fit
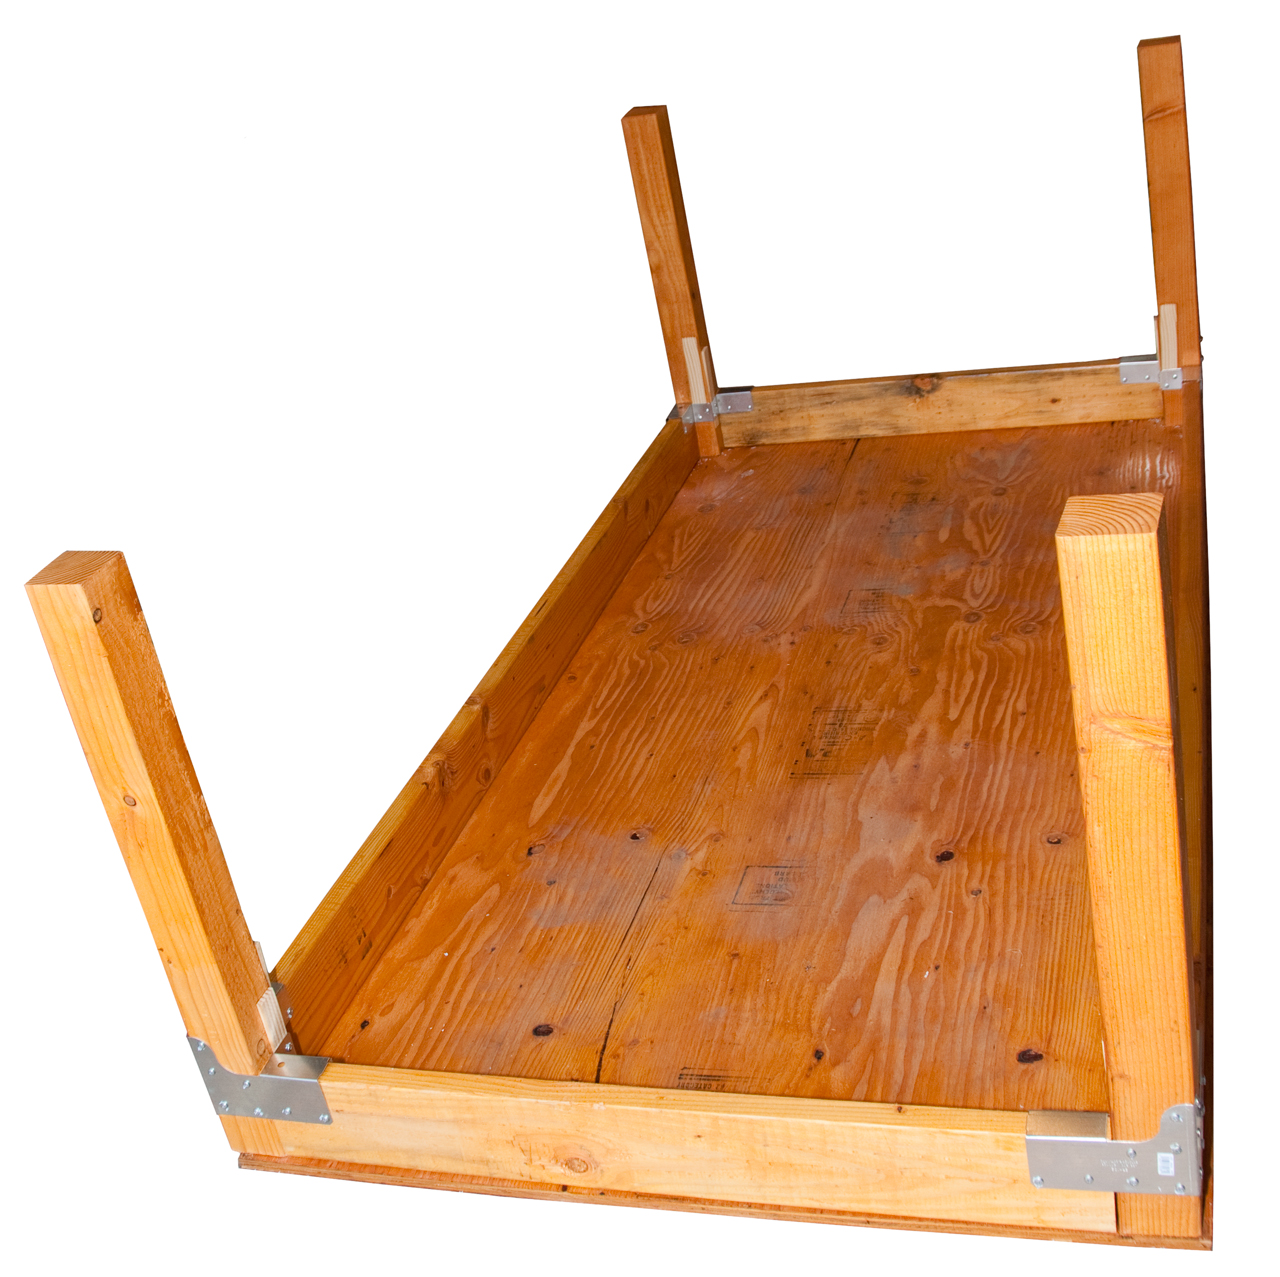
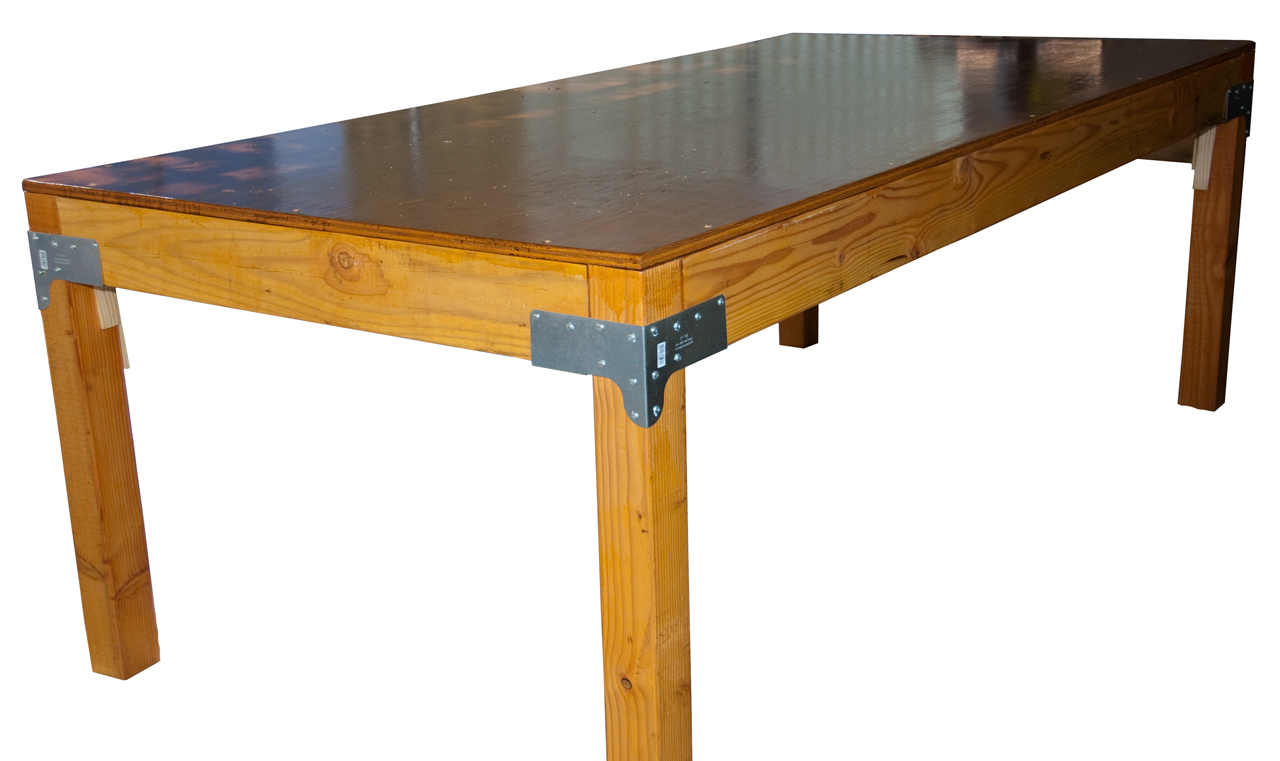
This is just a check to see that the legs, joists and brackets fit together and the overall dimensions are correct. (see Fig. 3).
Attach Brackets
A carpet was placed on the garage floor since the good side of the plywood is facing down.
Next the frame was laid out as above on the plywood.
It helps to have a helper to hold and brace the lumber as the screws are installed.
The brackets were installed by gravity. (It would have been better to use a weight to push the bracket down on the joists).
Even though the SD8 screws have a tip that acts like a drill bit (no pre-drilling needed) I also pulled each screw across a bar of soap to make it easy for them to go in.
First the brackets were screwed to the 4x4 leg keeping the bracket tight against the 4x4.
Next a joist was pushed up against the 4x4 leg and the leg moved in rotation so that the leg was tight against the joist at the top and bottom.
The joist was screwed to the bracket.
The other joist attached in a similar manner.
Then the screws on the inside for the joists were installed.
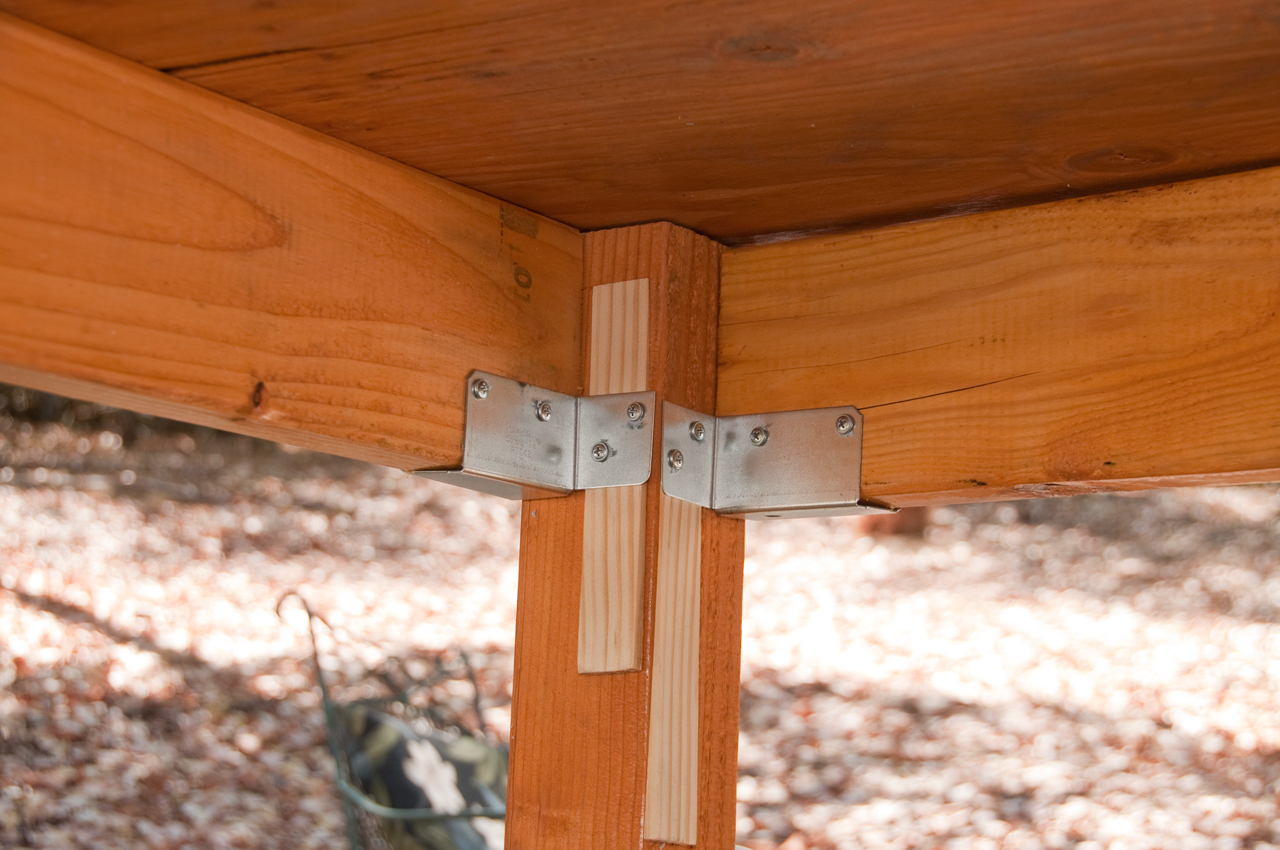
Last shims were placed between the bracket and 4x4 leg ( Fig 5) and tapped till tight, then the final screws installed into the 4x4 leg.
The above was repeated for the other legs.
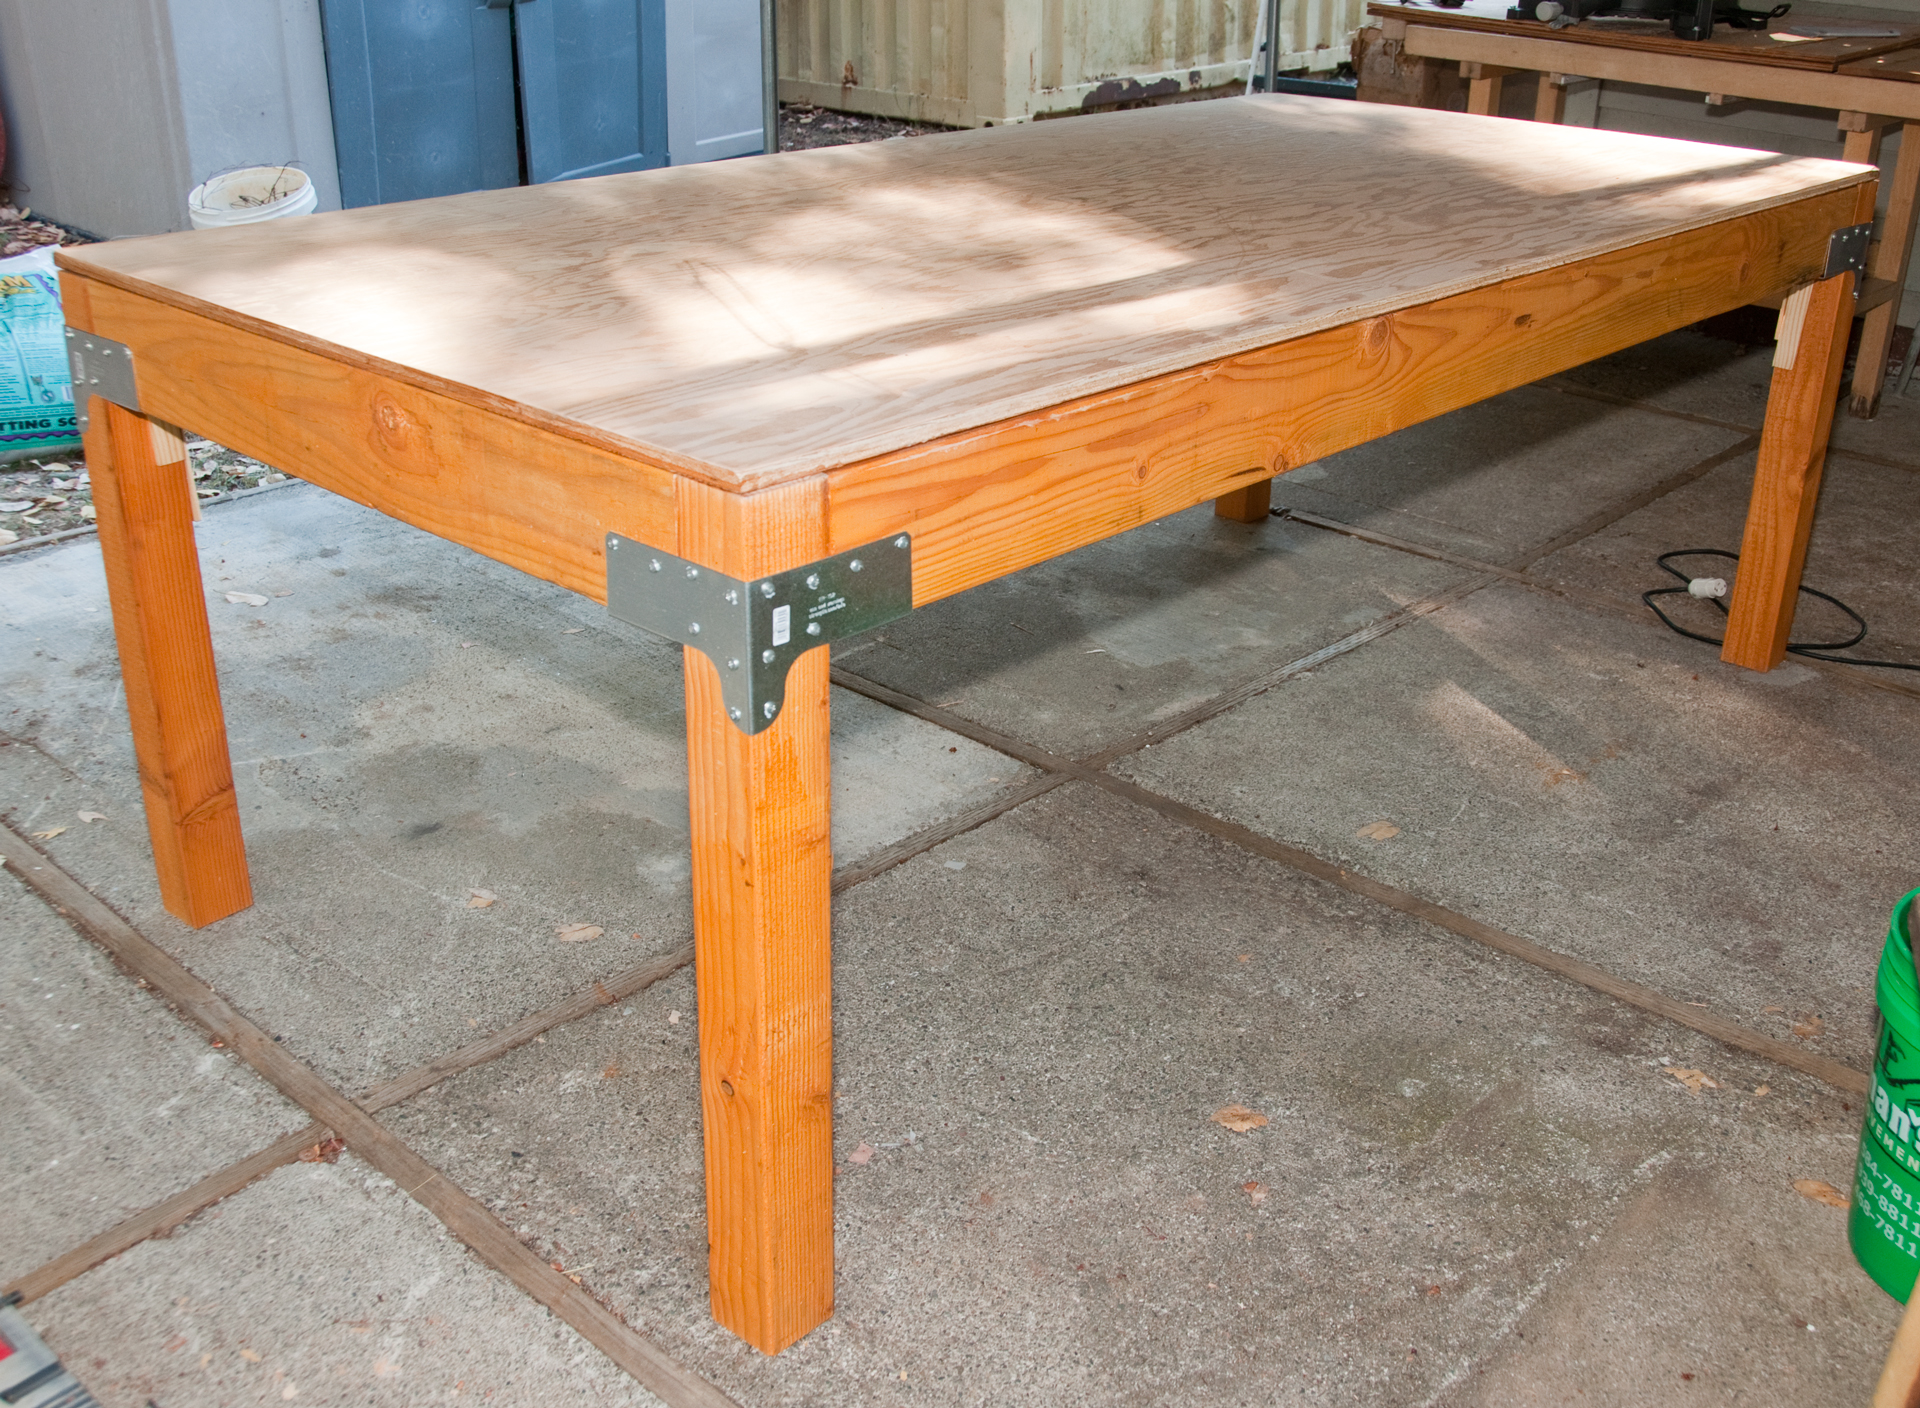
The frame was carried outside by 2 people, then the top carried outside and placed, good side up on the frame.
The top edges of the plywood were sanded and the corners got a little rounding. Tomorrow I'll Watco-Urethane the top prior to attaching the top to the frame.
Note it takes 7 screws on each outside face (Fig 8) (14 total outside screws) and 4 screws on each inside face (Fig 9) (8 total inside screws) for a total of 22 screws per bracket.
Since a box contains 100 screws there should be a dozen screws leftover. These screws are too short to use for attaching the plywood top.
Top Finishing
Done before the plywood is attached to the frame so it can be pushed around. This allows wiping up any finish that runs to the bottom of the plywood.
Fig 7 was taken after the first coat on the top.
The first coat took a batch and quite some time and elbow grease. The second coat too much less time and there was maybe 1/2 cup of mix left over.
The plan is to flip the plywood tomorrow and put a second coat on the bottom side and do the edges yet again. Then the next day flip so the good side is up and lightly sand to knock off all the bristles then give it a final (third) coat.
After a day the second top coat is still tacky. It's going to take another day or a few for it to really harden up.
Still thinking about how to fill the holes around the screws that fasten the top to the joists in order to keep water from getting into the plywood.
Attach Top
I used the Deckmate T25 screws because the head diameter matched a screw pilot drill that was part of the Makita kit of stuff.
Along the 8' side starting at the center (4') the screws were spaced 21" apart.
Along the 4' side starting at the center (2') the screws were spaced 18" apart.
Note: A dead blow (rubber) hammer was used to move the plywood so it was aligned at all four corners. This required also pushing the frame so that it sat square.
Once the frame and plywood were all aligned then the screws were installed.
The heads of the screws are about 1/8" below the bench top.


Photos


Related
Geodesic Dome Connector Plates
Miter Saws
Fasteners
Links
Google SketchUp - Maker Bench: an open source, CNC workbench for everyone - a small version of the Ron Paulk bench, more the size of a desk. It uses laser cut plywood so is not a DIY project.
PRC68, Alphanumeric Index of Web pages, Contact, Products for Sale
Page created 13 July 2015